
| Download Type | Control software |
|---|---|
| Model name | RS-BA1 Version 2 |
| Version | Version 2.41 |
| Update | 2021/12/24 |
| Major changes |
|
| Note |
|
| File Size | 23.60MB |
| File Type | zip |
| Down | Down |
Views: 82
| Download Type | Control software |
|---|---|
| Model name | RS-BA1 Version 2 |
| Version | Version 2.41 |
| Update | 2021/12/24 |
| Major changes |
|
| Note |
|
| File Size | 23.60MB |
| File Type | zip |
| Down | Down |
Views: 82
WINDOWS 11 下载
Windows 11 (consumer editions), version 22H2 (updated Nov 2022) (x64) – DVD (Chinese-Simplified)
文件:zh-cn_windows_11_consumer_editions_version_22h2_updated_nov_2022_x64_dvd_2c7e96c3.iso
大小:5.28GB
MD5:025B268F7E6B5307092EF3EB33AF51CE
SHA1:D530123B31E1D59B27C738E6ED9A12E406A32BC8
SHA256:3AFD533360E911273968EA5309444DEEE95F10BE10DACE19A3DE3DEB40ADAA91
Windows 11, version 22H2 (ARM64) – DVD (Chinese-Simplified)
文件:SW_DVD9_Win_Pro_11_22H2_64ARM_ChnSimp_Pro_Ent_EDU_N_MLF_X23-12755.ISO
大小:5.33GB
MD5:DD3703A2940E11021A40DE1F5E1A6312
SHA1:AD8F1DF74A45A0788B53C59B916E9D69F8E1D544
SHA256:6C308F4139F9938E369BC987CBCC983EC293506AB29C736ABDD8284CEBBC5BF7
http://ed2k://|file|SW_DVD9_Win_Pro_11_22H2_64ARM_ChnSimp_Pro_Ent_EDU_N_MLF_X23-12755.ISO|5719896064|D6DE1514C942ED84DB037F56E4457904|/
Views: 56
| 下载类型 | 固件 |
|---|---|
| 型号名称 | IC-7300 |
| 版本 | 版本 1.41 |
| 更新 | 2021/07/09 |
| 主要变化 | 1.40 版的变化
|
| 笔记 |
|
| 文件大小 | 2.73MB |
| 文件类型 | 压缩 |
| 下载地址 | https://www.icomjapan.com/uploads/support/firmware_driver/7300_141.zip |
| 文件大小: 2866618 字节 MD5: A2967167E8F815EBC7E86C9712AFD83E SHA1: 5C0CC77B4508350655358DE937D6162217301CCE CRC32: 54B8A4A2 |
Views: 16
我们先要了解一下4B之前的版本的启动流程,主要分为四个阶段:
GPU读取芯片上一个ROM的内容并执行
ROM中的程序挂载SD卡并加载第一个FAT分区上的bootcode.bin
bootcode.bin从FAT分区加载start.elf
start.elf从FAT分区加载kernel.img,然后唤醒CPU,CPU开始执行kernel.img
从这个流程中可以看到,第一阶段的BootLoader是从芯片上的ROM中读取的,ROM里的代码是出厂定制好的后期不能再改变。然而随着4B的硬件升级,USB被移到了PCIe总线,网卡也用了新的型号,再加上4B启动过程和SDRAM的设置远比之前的型号要复杂的多,继续使用集成在SoC ROM中的代码是有很大风险的,所以4B增加了一块EEPROM来解决这个问题,启动程序写入到EEPROM中来取代bootcode.bin的工作,启动程序的bug修复和新功能添加都方便了很多。
Views: 46
1 首先开启树莓派4B SSH并登陆
2 开启root 并使用 root登陆 相关命令如下:
设置root用户密码
sudo passwd root
启用root用户
sudo passwd –unlock root
设置ssh允许登录
sudo sed -i “s/^#PermitRootLogin.*/PermitRootLogin yes/g” /etc/ssh/sshd_config
重启ssh服务
sudo systemctl restart ssh
为root用户应用于当前用户相同的bash配置
sudo cp ~/.bashrc /root/.bashrc
3 更新下系统 相关命令如下:
sudo apt-get update && apt-get upgrade -y
4 安装必要的软件支持 相关命令如下:
dpkg –add-architecture armhf
apt-get update
apt-get install libc6:armhf libstdc++6:armhf
5 遵循github上有关Airspy Host Tools安装的说明 相关命令如下:
sudo apt-get install build-essential cmake libusb-1.0-0-dev pkg-config
wget https://github.com/airspy/airspyone_host/archive/master.zip
unzip master.zip
cd airspyone_host-master
mkdir build
cd build
cmake ../ -DINSTALL_UDEV_RULES=ON
make
sudo make install
sudo ldconfig
6 下载并运行spyserver 相关命令如下:
wget http://airspy.com/downloads/spyserver-arm32.tgz
tar xzf spyserver-arm32.tgz
./spyserver spyserver.config
正常运行截图

================================================================
使用网络连接 spyserver 后的 SDRSharp 软件中 NFW 与WFM 带宽 会被限制 需要修改 SDRSharp客户端目录下 SDRSharp.exe.Config中
<add key=”minReducedNarrowBandwidth” value=”12500″ />
<add key=”minReducedWideBandwidth” value=”150000″ />
==================================================================
给 spyserver 添加 自启
进程守护
1 创建 服务名字 根据自己喜好 相关命令如下:
vi /usr/lib/systemd/system/spyserver.service
内容 相关命令如下: — 路径根据实际修改–
[Unit]
Description=spyserver
Documentation=https://Bi4Qzw.Com
[Service]
WorkingDirectory=/home/spyserver/spyserver-arm32
ExecStart=/home/spyserver/spyserver-arm32/spyserver spyserver.config
Restart=on-abnormal
RestartSec=10s
KillMode=mixed
[Install]
WantedBy=multi-user.target
建议设置权限 0777
2 设置开机自启动 相关命令如下:
# 更新配置
systemctl daemon-reload
# 启动服务
systemctl start spyserver.service
# 设置开机启动
systemctl enable spyserver.service
相关命令
# 启动服务
systemctl start spyserver.service
# 停止服务
systemctl stop spyserver.service
# 重启服务
systemctl restart spyserver.service
# 查看状态
systemctl status spyserver.service
———————————————————————-END —————————————————
————————————————
Views: 39
SAP stands for SIM Access Profile, so you have to disable it:
Open /etc/systemd/system/bluetooth.target.wants/bluetooth.service
Change:
ExecStart=/usr/lib/bluetooth/bluetoothd
To
ExecStart=/usr/lib/bluetooth/bluetoothd –noplugin=sap
Reload the systemd:
$ sudo systemctl daemon-reload
Restart the bluetooth:
$ sudo service bluetooth restart
Get the bluetooth status:
$ sudo service bluetooth status
bluetooth.service – Bluetooth service
Loaded: loaded (/lib/systemd/system/bluetooth.service; enabled)
Active: active (running) since Sat 2016-04-30 10:38:46 UTC; 6s ago
Docs: man:bluetoothd(8)
Main PID: 12775 (bluetoothd)
Status: “Running”
CGroup: /system.slice/bluetooth.service
└─12775 /usr/lib/bluetooth/bluetoothd –noplugin=sap
Views: 54
| Model name | IC-7300 |
|---|---|
| Version | Version 1.40 |
| Update | 2021/02/26 |
| Major changes | Changes from Version 1.30 [Spectrum scope is improved] – A Scroll mode that can seamlessly change the displaying scope range, depending on the operating frequency, is added. – A popup screen that displays when SPAN or EDGE change is added. – The number of FIX EDGE memories is expanded to 4. – Each band independently memorizes the Reference level. – Improved the Scope function of the RS-BA1.[Preset function is added for FT8 operation] – A Preset function that can set each operation is added. [Multi-function dial is enhanced] [Other changes] Refer to INFORMATION IC-7300 Version 1.40 for details.
The Scroll mode for the RS-BA1 Version 2 software will be added to Version 2.30. |
| Note | To update the firmware
|
| File Size | 2.73MB |
| File Type | zip |
https://www.icomjapan.com/uploads/support/firmware_driver/7300_140.zip
文件名称: 7300_140.zip
文件大小: 2863000 字节
MD5: BC436FDA764B6B06E12FAB2DAB712165
SHA1: 217A370EB67C9133DE3CA6B84F134B53DC61EF70
CRC32: 001DE31B
腾讯微云下载: 链接:链接:https://share.weiyun.com/dcebuRN9 密码:bi4qzw
百度网盘下载 链接:https://pan.baidu.com/s/1_wFY0spVZfvx8jmZP3ZBAg 提取码:4qzw
Views: 57
Impacted product versions:
Functionality Impacts:
Functionality impacts are limited to environments that use vRealize Operations. It should be noted that the vulnerable endpoint exists in vCenter Server whether or not vRealize Operations has ever been introduced to the environment.
    <Matrix>
<pluginsCompatibility>
  . . . .
  . . . .
<PluginPackage id="com.vmware.vrops.install" status="incompatible"/>

          </pluginsCompatibility>
    </Matrix>
   <Matrix>
<pluginsCompatibility>
  . . . .
  . . . .
<PluginPackage id="com.vmware.vrops.install" status="incompatible"/>

          </pluginsCompatibility>
    </Matrix>
    <Matrix>
<pluginsCompatibility>
  . . . .
  . . . .
<PluginPackage id="com.vmware.vrops.install" status="incompatible"/>

          </pluginsCompatibility>
    </Matrix>
For more information on how to start/stop/restart services. Refer to below KBs:
Views: 48
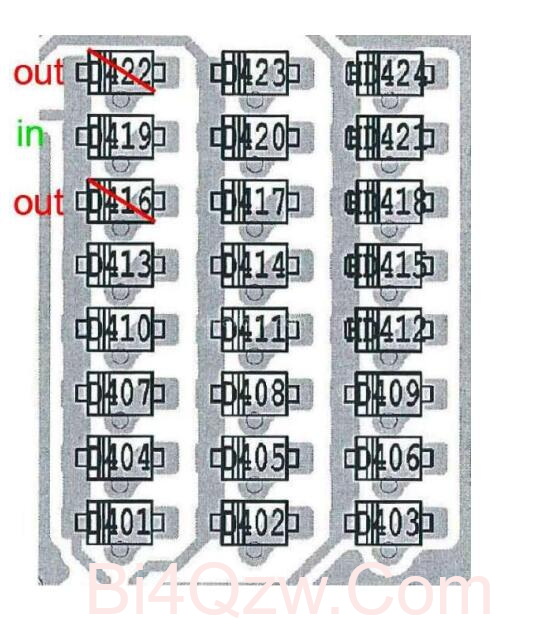
移除底部外壳,找到二极管矩阵(靠近大芯片)
-移除D422 0.1-74.8Mhz 收发
-移除D416 只允许0.030-74.8MHz 接收范围
-移除D405 5.255-5.405MHz (60m)的发射和接收范围
Views: 99
Views: 6